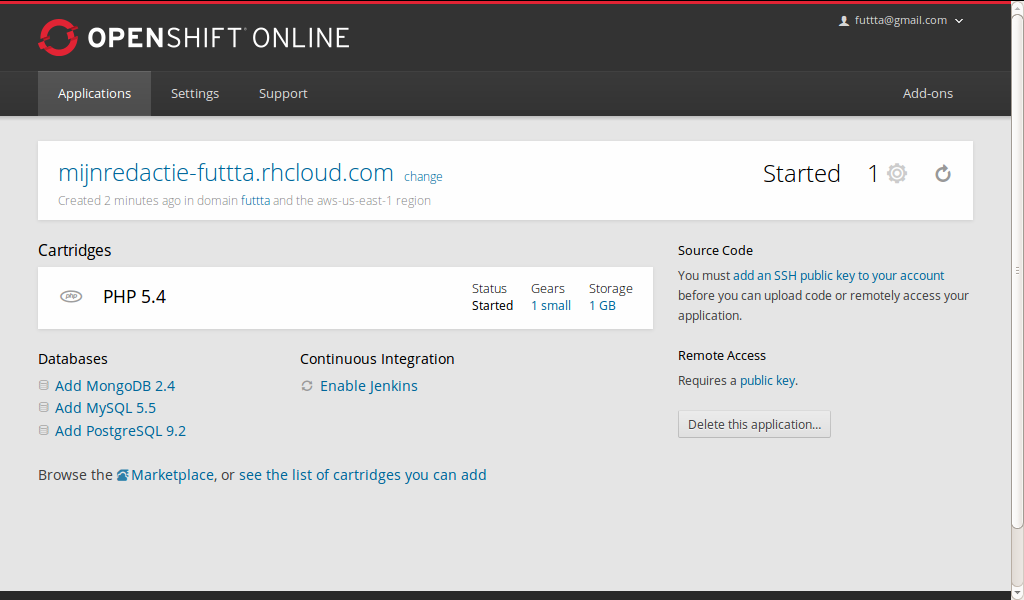
Vul een naam in voor de public URL, copy/paste https://github.com/futtta/redactie in het source code veld en klik op “Create application“
Even geduld terwijl uw eigenste redactie wordt aangemaakt. In het laatste scherm kunt ge eventueel git access configureren (“Will you be changing the code of this application?”) of direct op “Visit app in the browser” (in mijn geval naar http://mijnredactie-futtta.rhcloud.com/) klikken.
While Akismet does a good job at flagging comments as spam, it by default only purges spam (from the comments and comments_meta tables) after 15 days. So it’s a good thing Akismet now has a filter to change the amount of days after which spam is removed. Below code (in a small plugin or in a child theme’s functions.php) should do the trick.
/** tell akismet to purge spam sooner */
add_filter('akismet_delete_commentmeta_interval','change_akismet_interval');
add_filter('akismet_delete_comment_interval','change_akismet_interval');
function change_akismet_interval($in) {
     return 5;
}
I’m helping on a site for a not-for-profit for which we selected “Expound” as the base theme. I like Expound; it looks great, there’s no jQuery- or webfont-cruft to worry about and although the CSS comes with a seperate reset.css-file, it does (Auto-)optimize perfectly. But I wasn’t happy with the menu color-scheme and with the fact that the menu lacked an indication that a child page of a main entry was being shown instead of the page of that main entry itself (confused much?). Anyway, this is what I ended up with;
For those wanting to do something similar, this is the relevant CSS in my child theme;
/* don't want no blue */
.navigation-main .current-menu-item > a {
        background: #557B47 !important;
}
/* triangle should not be blue either, need it to be a bit bigger */
.navigation-main ul > .current_page_item a:after, .navigation-main ul > .current-menu-item a:after, .navigation-main ul > .current-post-ancestor a:after, .navigation-main ul > .current-menu-parent a:after, .navigation-main ul > .current-post-parent a:after {
        border-top: 10px solid #557B47 !important;
        bottom: -14px;
        z-index: 1000;
}
@media screen and (min-width: 600px) {
  /* if page from submenu, add line under parent item to show your in that submenu */
  .navigation-main ul > .menu-item {
        border-bottom: 6px solid #3A3A3A !important;
  }
  .navigation-main ul > .current_page_item, .navigation-main ul > .current-menu-item, .navigation-main ul > .current-post-ancestor, .navigation-main ul > .current-menu-parent, .navigation-main ul > .current-post-parent {
        border-bottom: 6px solid #557B47 !important;
  }
  /* but not in submenu */
  .navigation-main .sub-menu > .menu-item {
        border-bottom: 0px !important;
  }
  /* less padding at the bottom to compensate for that extra line */
  .navigation-main a {
        padding: 10px 10px 4px !important;
  }
  /* except when in submenu */
  .navigation-main .sub-menu a {
        padding: 10px !important;;
  }
}
/* change color to default brown if child-item is active */
.navigation-main ul > .current_page_item, .navigation-main ul > .current-menu-item, .navigation-main ul > .current-post-ancestor, .navigation-main ul > .current-menu-ancestor, .navigation-main ul > .current-menu-parent, .navigation-main ul > .current-post-parent {
        background: #3A3A3A !important;
}
Damn, can’t shut down my phone to switch to “download mode”, it just reboots.
Yay, re-inserting battery while holding Volume down, Home & Power switches the phone to download mode after all, flashing with Odin!
Damn, flashed and rebooted, but installation wizard hangs, rebooting.
Yay, installation wizard completes after all.
Damn, ADW settings screwed (widgets & some shortcuts MIA)
Yay, almost done configuring ADW (except for the tethering shortcut on my desktop, can’t seem to reinstate that).
Damn, no keyboard selection in notification bar, so no Swype!
Yay, Swype available after all, hidden in “Language & Input” configuration.
So does Jelly Bean put the old S2 on the same level as the S3? Not really, some advanced S3-features aren’t included, think the ones in the Premium Suite for S3 that Samsung released a couple of months ago, especially “multi-window” (which might make less sense the smaller S2 display anyway). Both the Calender application and the mail-client (for my Exchange-mail) changed. Samsung replaced Calender with their own S Planner, which has a more skeuomorphic UI which doesn’t fit with the rest of the OS. Good thing you can install the default Android Calendar from Google Play. Mail got slightly better, with a nice little refresh-button and a timestamp showing when the last connection occurred (I don’t do push mail). But most importantly: Jelly Bean does feel more smooth (thanks to Project Butter) and at first sight battery life seems better as well. So, yeah, I’m happy!
I just had my monthly look at the comments spam queue and was baffled by the amount of spam-comments on WordPress attachments. WordPress, surprisingly, has no option to disable comments on media, so based on information in this codex page about the comments_open function, I quickly assembled a plugin to stop comments on items in the media gallery altogether. The code (which can also be added in functions.php instead of going into a plugin):
<?php
/*
Plugin Name: No Media Comments
Author: Frank Goossens (futtta)
Plugin URI: http://blog.futtta.be/
Author URI: http://blog.futtta.be/
Description: Stop comments on media attachments
Version: 0.1
*/
add_filter( 'comments_open', 'noMediaComments', 10, 2 );
function noMediaComments( $open, $post_id ) {
$post = get_post( $post_id );
if ( 'attachment' == $post->post_type )
$open = false;
return $open;
}
?>
After throwing that at my server and seeing it worked, I realized there had to be a plugin for this and I indeed found Disable Comments and Comment Control in the wordpress.org plugin repository. Both plugins are by the same author and are only slightly different in scope really. So if you want to stop the comment spam on attached images on your WordPress blog, you’ve got several options. But shouldn’t this be tackled in WordPress core instead, really?
The messages in question are Read Receipts, Delivery Receipts and similar messages. Once there is one of those in your inbox, you’re stuck until you delete it. […] A better solution which has worked for me is to create a folder for your receipts. Then, on your PC, create a rule to move the receipts to the folder on arrival. This will obviously also work when your PC is off, as the rules are stored and executed on the server. You will have to create a rule which processes emails on arrival, matches a series of strings in either subject or body of the message and moves them to the folder.
And that’s exactly what I did; mails sent only to me with “Declined:” or “Accepted:” or “Tentative:” or “Read:” or “Not read:” in the subject line are automatically moved into a “tmp” folder. Your mileage may vary (apparently there are other conditions under which the Android/ Samsung mail client has problems downloading items form Exchange), but based on my limited experience up until now, this workaround gets most problematic items in my Inbox out of the way. Now let’s hope Samsung fixes this blatant error (and that it isn’t in the ICS-version on that beautiful Samsung Galaxy S III)!
Although browser addons such as NoScript and Ghostery (which is cross-browser with some limitations) provide great protection against tracking, some people prefer not to have to install plugins. Firefox does have configuration options to somewhat limit what trackers can do. You can follow the knowledge base article here to learn how to disable 3rd party cookies (the default setting in Safari, which Google was caught circumventing). If you’re up to it, you also simply open up the almighty “about:config” and tinker with the following settings (some of which aren’t available in the browser UI):
network.cookie.cookieBehavior with values:
“0”: allow all cookies (default)
“1”: don’t allow 3rd party cookies
“2”: don’t allow any cookies
network.cookie.thirdparty.lifetimePolicy with values:
“0”: keep cookies for as long as the server asks
“1”: ask the user on each and every cookie set (try it out if only for fun, you’d be surprise how much cookies are set)
“2”: cookie gets deleted when you close your browser (i.e. at the end of the session)
network.cookie.thirdparty.sessionOnly: set to “true” or “false”
privacy.donottrackheader.enabled: set to “false” (default) or “true”, which gently asks sites not to track you
Setting “network.cookie.thirdparty.sessionOnly” to “true” is a low-impact change which should stop tracking-companies (think Media6degrees or Quantcast) from following you around the web. If you want to stop Facebook, Google & Co to stop tracking you around the web as well, the above setting will not suffice. You should either log out of their sites as soon as you’ve done your business there or set “network.cookie.cookieBehavior” to “1” (which will break their “social widgets”). Or you can install Ghostery or NoScript, off course.
If you don’t like Facebook’s omnipresent Like widgets (there were already plenty of reasons why not to like them and last week’s cookie-debacle only added to that conclusion) and if you already use NoScript so you don’t want to install another plugin (like Ghostery, which reports any tracking activity and allows you to block it), you can put this in NoScript’s ABE user ruleset (NoScript Options -> advanced -> ABE); # Allow Facebook scripts and objects to be included only # from Facebook pages Site .facebook.com .fbcdn.net .facebook.net Accept from .facebook.com .fbcdn.net .facebook.net Deny INCLUSION(SCRIPT, OBJ, SUBDOC) This tells NoScript to allow Facebook scripts (you know, to visit facebook.com), but to stop them from being included in other sites. I guess with NoScript’s surrogate scripts one might even be able to replace Facebook’s Like-widget with one that just shows the old-fashioned (and harmless) share-button. Now wouldn’t that be fun?
So you know about SSL (or rather TLS) and you prefer things secure, so you request and pay for an officially signed certificate and configure your Apache to use it. The next days you’re feeling very Kevin Mitnicky, until some nitwit on Twitter trashes you for the ugly error-message he sees when trying to visit your supposedly “secure” site that is. What’s up with that? Well, chances are that your disgruntled visitor was using a browser you didn’t test on, like Chrome on Mac for example? Because there is a small issue you have to take into account when “doing https”; both Chrome and Safari (but not Firefox) on Mac use OS X’s keychain, which does not have some of the intermediate certificates needed to establish the trust relationship between your signed certificate and the certificate authority’s root certificate. As you can’t expect Apple to add intermediate certificates to their keychain by default (which Firefox does a pretty good job though) and you can’t ask all your OS X users to add the intermediate certificate by hand either, you’ll have to solve this yourself. A good thing Apache can help you in that department with it’s SSLCertificateChainFile directive, which
sets the optional all-in-one file where you can assemble the certificates of Certification Authorities (CA) which form the certificate chain of the server certificate. This starts with the issuing CA certificate of the server certificate and can range up to the root CA certificate.
If there’s only one intermediate certificate missing between your’s and the CA’s, you can export it in good old Firefox (as a pem-file), place it in the same directory as the actual certificate and use SSLCertificateChainFile to tell Apache where to find it and that should solve the nasty errors those Twittering Mac-heads get.
So you’re a wanna-be developer who’d love to deploy in the cloud, but you only “know” PHP? Well, as you might already have read elsewhere Caucho, the company behind Resin, has a 100% Java GPL’ed implementation of PHP5 called Quercus that can be used to run PHP on GAE. It took me some time to put the pieces of the puzzle together, but in the end it’s pretty straightforward. From scratch to a deployed webapp in 7 steps:
Put the app id from (5) in projects/phptemplate/war/WEB-INF/appengine-web.xml, between the <application>-tage
Upload your application as described here: appcfg –enable_jar_splitting update <path-to-war> (–enable_jar_splitting is needed as the WEB-INF/lib/resin.jar is rather big)
And there you have it, your very own PHP-app on GAE! Check out the Quercus info on on how you can access Java components from within you PHP-code, it might come in very handy to use GAE’s Java API’s for the datastore, queues and all those other goodies! (Disclaimer: while this here template seems to work, I can’t make any promises or provide any kind of warranty. As soon as you download it, you assume all responsibilities for any problems you might cause to the Internet, GAE or the Ozone-layer.)